


Join TMAX, become an agent!
Join TMAX, become an agent!
Sales Manager: Gia
Email: Gia@tmaxlaboratory.com
Wechat: Dingqiuna
Item No.:
TMAX-HBYY-40Payment:
L/C, T/T, Western Union, Credit Cards, PaypalShipping port:
Xiamen PortLead Time:
15 DaysCertificate:
CE, IOS, ROHS, SGS, UL CertificateWarranty:
One year limited warranty with lifetime technical supportLab 40T or 60T Automatic Vertical Press Machine
A. Introduction
First of all, thank you for choosing our products. Before installing, operating, maintaining and inspecting the equipment, please read this "User Manual" in detail to give full play to the functions of the equipment and ensure the safety of the product.
The schematic diagram of this user manual is for convenience. Due to product upgrade and other reasons, it may be different from the actual product. Please refer to the actual product.
B. Safety precautions
1. The operator must be familiar with the performance, characteristics and operating conditions of the equipment, and check whether the grounding wire is connected correctly and reliably before closing.
2. After the device is powered on and before starting, check whether the parameters of the touch screen are set correctly. The upper limit of pressure for 40t model is 400KN (40 tons), and the upper limit of pressure for 60t model is 600KN (60 tons). When using the device, avoid setting the upper limit value.
3. Check whether the beam is closed before pressing the sample. After closing the beam, ensure that the concave of the beam is completely stuck into the convex head of the column, the mold indenter is correctly placed in the mold, and the screw is screwed against the mold indenter before starting the sample pressing.
4. Pay attention to the pressure indicator of the pressure gauge during the sample compaction. Press the stop button immediately when the 40t model reaches 28Mpa and the 60t model reaches 30Mpa.
5. Pay attention to the pressure of the mold during the sample, and press the stop button immediately if any abnormality is found.
6. Before the device is connected to the power supply, ensure that the voltage used is consistent with the voltage required by the device, and ensure that the rated load of the power switch is greater than the device requirements;
Special reminder: The power supply of this machine is 50HZ/three-phase 380V power supply, and the power cable of the equipment is: three fires and one ground (in which the yellow-green two-color wire is the ground wire).
C. Product introduction
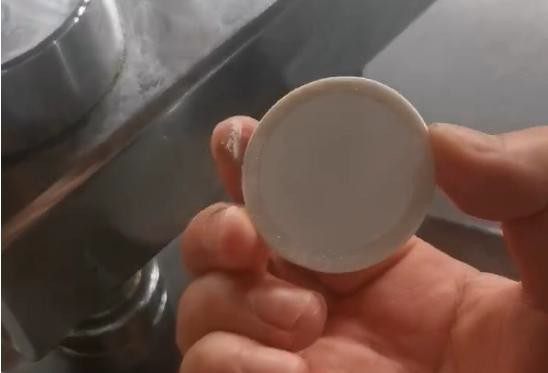
Sample pressing machine is mainly used in the fluorescence spectrometer on the solid sample making and various small powder tablet molding, widely used in powder metallurgy, cement, solid waste, catalytic, silicone hydrochloric acid, batteries, ceramics and universities and colleges and other fields of the composition analysis of the powder will be pressed into the specimen for the XRF radio fluorescence spectrometer and infrared spectrometer to provide specimens of the product.
D. Technical parameter
|
Equipment name |
Automatic sample pressing machine |
|
Equipment type |
HBYY-40 |
|
Control mode |
Touch screen operation, PLC program control, sensor sensing pressure value |
|
Mold type and size |
The size of the steel ring can be selected as follows (outer diameter × inner diameter × height) : 40×34×12mm, 47×34×10mm, 51.5×34×10mm |
|
Boric acid mold size: outer diameter 40mm, detection surface diameter 34mm |
|
|
Aluminum cup size (outer diameter × inner diameter × height) : 39.5×38×8mm |
|
|
The size of the plastic ring can be selected as follows (outer diameter × inner diameter × height) : 40×34×4.5mm (commonly used), 38×32×5mm, 32×28×4mm, 29.2×24×4mm, 25.2×20×4mm, 19.2×14×4mm |
|
|
Maximum pressure |
40T(400kN) |
|
Other optional maximum pressure |
30 t/t / 60 40 t / 80 t / 100 t / 120 t (according to demand customization) |
|
Holding time |
0~999s (adjustable) |
|
Overall dimensions of equipment |
770×520×1180(mm) |
|
Equipment weight |
About 265kg |
|
Supply voltage |
AC 380V±5%, 50Hz, three-phase The power cord is three fires and one ground (yellow and green two-color wire is the ground wire) |
|
Motor power |
1.1KW |
|
Use environment |
Recommended usage: ambient temperature 1 ~ 40℃; If the ambient temperature is below zero or plateau area, please inform us in advance. |
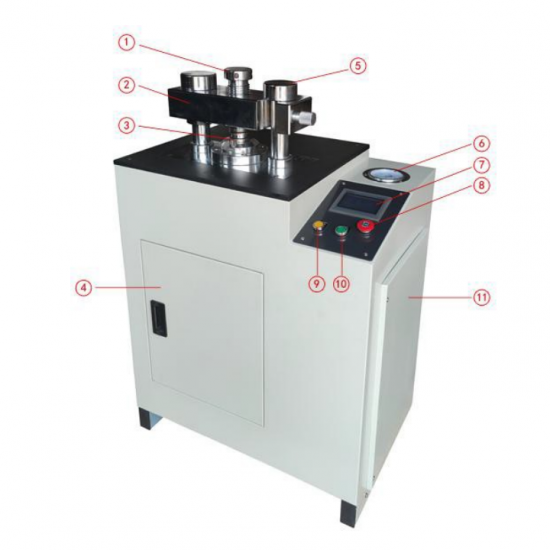
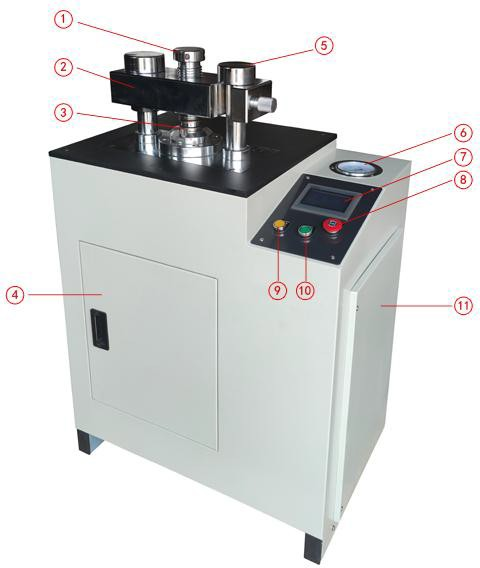
E. Appearance diagram of sample press machine
|
1. Lead screw |
2. Beam (Rocker arm) |
3. Mold |
4.Maintenance entrance |
|
5. Column |
6. Pressure gauge |
7. Touch screen |
8.Emergency stop button |
|
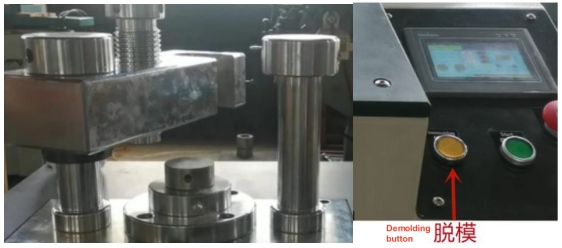
9.Release button |
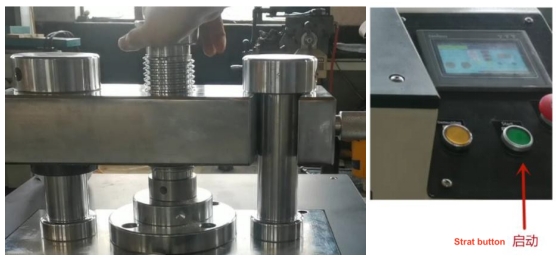
10. Start button |
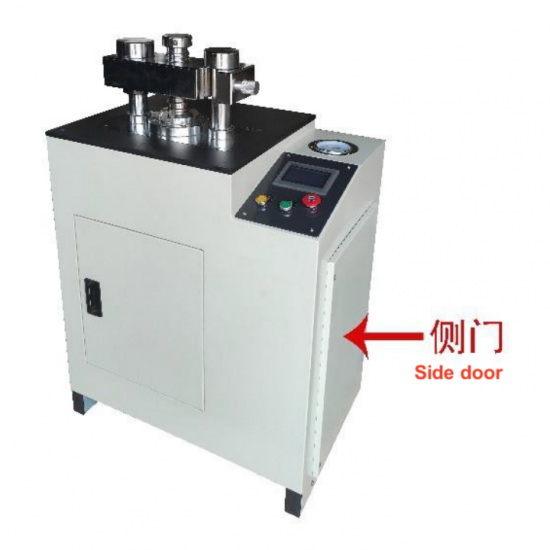
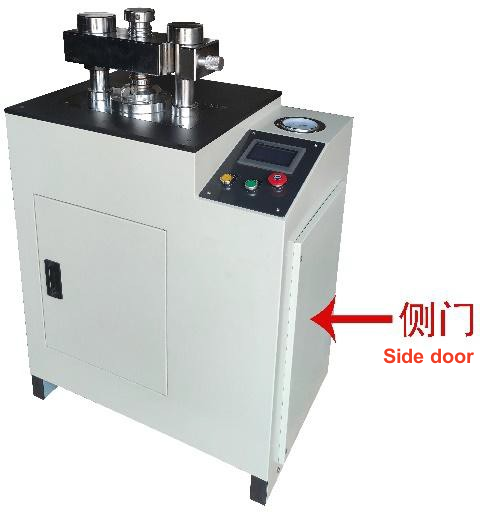
11. Side door for maintenance |
|
F. Equipment installation
First step
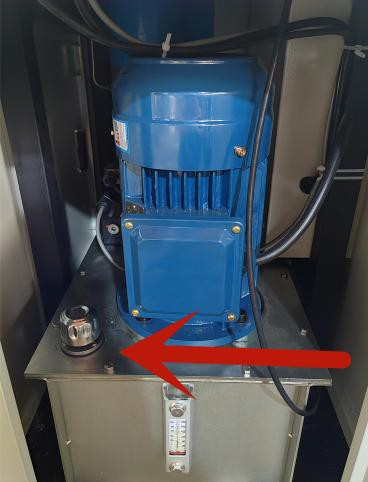
Place the equipment horizontally on a solid and flat ground, open the side door of the machine, and add No. 46 hydraulic oil to the oil level gauge 2/3 (hydraulic oil customer's own).
The second step
The power supply of this equipment is three-phase 380V with a power of 1.1KW. The random power cable is three phase wires and one ground wire (the ground wire is a two-color wire). A three-phase circuit breaker with leakage protection is required for this equipment. The three phase wires of this equipment are respectively connected to the three terminals of the three-phase circuit breaker, and the ground wire and the ground end are reliably connected to ensure the safety of electricity consumption.
Open the circuit breaker, supply power to the equipment, open the press machine, push the beam, remove the mold indenter, press the release button to check whether the piston rises, if it rises, the motor test is normal, if not, close the three-phase circuit breaker, and adjust any two of the three phase lines before testing.
G. Touch screen parameter setting
Enter the touch screen control interface:
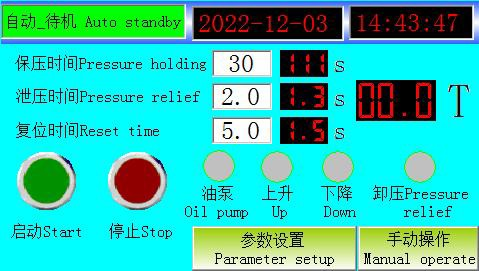
1. The setting of pressure holding time: that is, the setting of the sample pressure (maintain pressure) time within the set pressure value.
2. Setting of pressure relief time: that is, setting of the time used by the pressure relief valve during the pressure relief process after the sample is held. Example: The pressure relief time is 1.5S, that is, the pressure relief valve starts to stop after 1.5S of pressure relief. The purpose is to release part of the pressure in advance when the piston is reset and lowered. The setting time is long and the pressure is released more.
3. setting of reset time: that is, the time of the piston descending walking process after the end of the pressure holding, for example, the reset time is set 5S, that is, the piston stops after walking down for 5S, and the setting time is long and the descending stroke is large. This setting is mainly used to control the stop of the piston after the end of the pressure holding is returned to the appropriate position in the mold.
4.![]() : Real-time display of the pressure value of the sample.
: Real-time display of the pressure value of the sample.
5.![]() : Click to enter other parameter settings.
: Click to enter other parameter settings.
6.![]() : Click to change to manual control.
: Click to change to manual control.
Boric acid mold/aluminum cup mold parameter settings are referenced as follows:
Pressure holding time: 30S;
Pressure relief time: 3S;
Reset time: 1S;
Steel ring mold parameter settings are referenced as follows:
Pressure holding time: 30S;
Pressure relief time: 2S;
Reset time: 5S;
Plastic ring mold parameter setting reference is as follows:
Pressure holding time: 30S;
Pressure relief time: 1S;
Reset time: 6S;
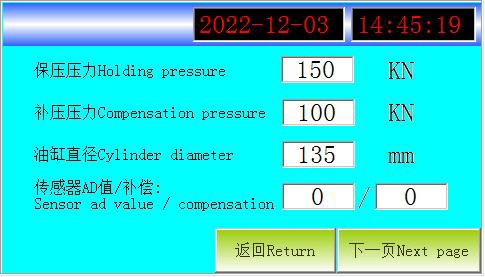
7. Holding pressure setting value: the maximum pressure value required for pressing samples; the maximum limit of this machine is 400KN; overload use is prohibited.
8. Compensating pressure setting value: when the pressure reaches the maximum pressure value and then the pressure naturally drops to the compensating pressure setting value, the program will pressurize again to compensate the pressure to the holding pressure value.
9. 40T cylinder diameter: 135mm; 60T cylinder diameter: 160mm.
10. Sensor AD value/compensation: default setting.
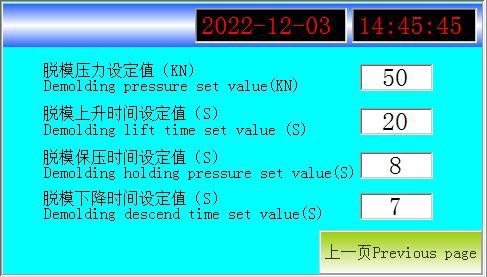
11. Demolding pressure setting value: that is, the sample is demolded after the pressing is completed, and the rising process does not exceed the demolding pressure setting value. 12. Rise time setting value of demolding: that is, demolding will be carried out after the sample pressing is completed, and the piston will stop rising when it rises to push out the sample and reaches the rise time setting value of demolding.
13. Demolding holding time set value: when the piston rises to the demolding rise time set value, the piston stops rising, at this time the operator to take away the pressed samples, clean up the dust, demolding holding time set value that is: take away the samples, clean up the time required for the dust, when it reaches the set value of the time, the piston will automatically fall, waiting for the next sample pressing.
14. The set value of demolding and descending time is: the time for the piston to descend, and it will stop descending when it reaches the set value.
Note: Do not use the demolding button when using the steel ring mold, forced demolding will damage the mold or cause other losses.
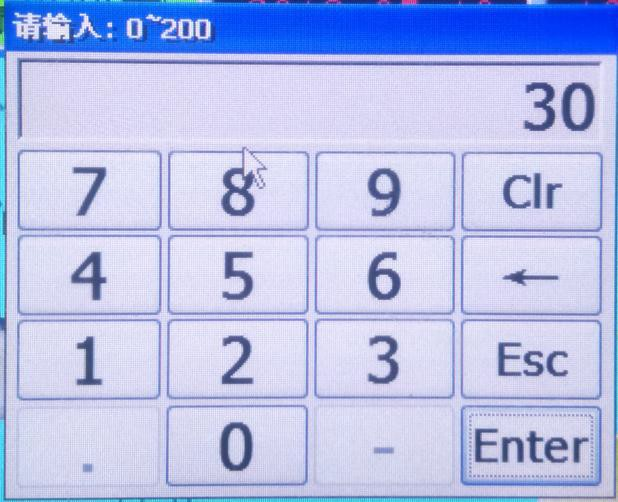
15. Parameter setting: Click the white number box, in the pop-up dialog box, set and click "Enter" key.
Clr: Clear key to clear the current number;
← : Backspace key to delete the previous digit;
Esc: Exit key to return to the home page.
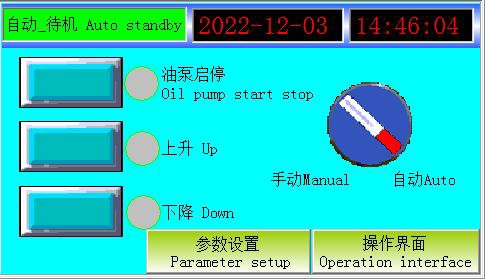
16. Manual control of equipment:
Step 1: Click the manual button in the lower right corner of Figure 1 to enter the manual control interface;
Step 2: Click the manual/automatic switch button, switch the automatic to the manual state, and then click the "oil pump start and stop", then the gray indicator light will turn green, and the oil pump will open;
Step 3: Long press the "up" or "down" button to test the up and down operation of the cylinder, and the gray indicator will turn green when clicking any button;
H. Various mold sample pressing procedures (four molds)
(A) Boric acid mold sample pressing procedures

1. Setting, holding pressure/replenishing pressure/holding time values, other parameter values are adjusted according to the actual situation.
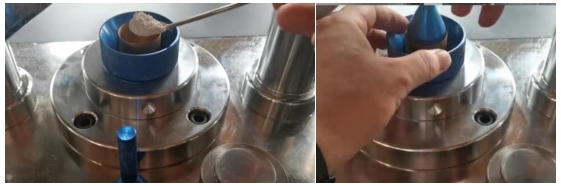
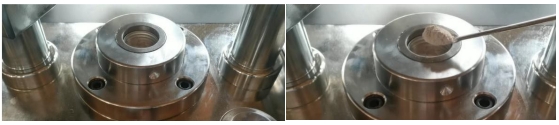
2. Push away the beam, screw the sample funnel into the hole of the mold, use the spoon to fill the powder sample into the middle hole of the funnel, the loading amount is generally about 5g, and can be adjusted according to the actual situation of the loading amount.
3. After loading the sample, use the flattener to push the sample flat.
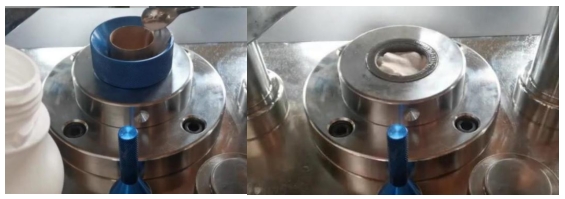
4. with a spoon to the pure boric acid evenly sprinkled to the funnel around the diagonal holes, boric acid through the funnel around the diagonal holes fall into the mold holes, and then in the middle of the funnel holes sprinkled a little bit of boric acid, boric acid dosage is generally a few grams or so.
5. Take away the sample funnel, and then slightly supplemented by some boric acid, with the flattener to push the boric acid powder.
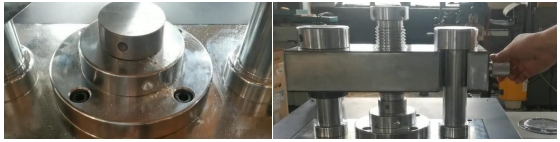
6. Cover the mold indenter, gently rotate and screw it in.
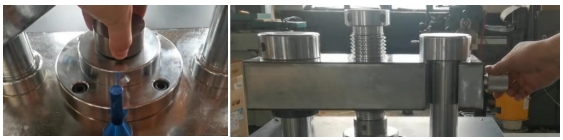
7. Close the crossbeam and snap the crossbeam recess into the column boss.
8. Screw the screw and hold the mold indenter.
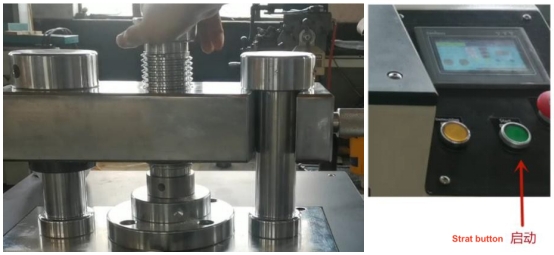
9. Press the start button, start pressing the sample, hold pressure
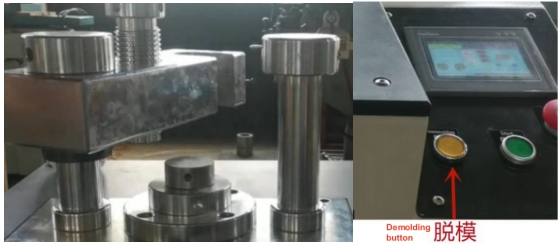
10. After the sample holding pressure is finished, loosen the screw, push away the beam and press the demolding button to start demolding.

11. After demolding, remove the mold indenter and take the pressed sample.
(B) Aluminum cup mold pressure sample operation steps
1. Set the value of holding pressure/replacement pressure/holding time, and adjust the value of other parameters according to the actual situation.
2. Push open the beam, the aluminum cup into the mold hole, the aluminum cup into the depth can be adjusted through the reset time settings.
3. Load the powder sample into the aluminum cup.
4.Cover the mold indenter
5. Close the crossbeam and snap the crossbeam recess into the column boss.
6. Screw the screw and hold the mold indenter.
7. Press the start button, start pressing the sample, hold pressure
8. After the sample holding pressure is finished, loosen the screw, push away the beam and press the demolding button to start demolding.
9. After demolding, remove the mold indenter and take the pressed sample.
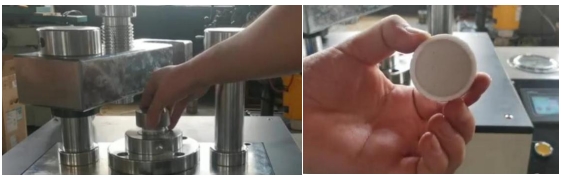
(C) Steel ring mold pressure sample operation steps
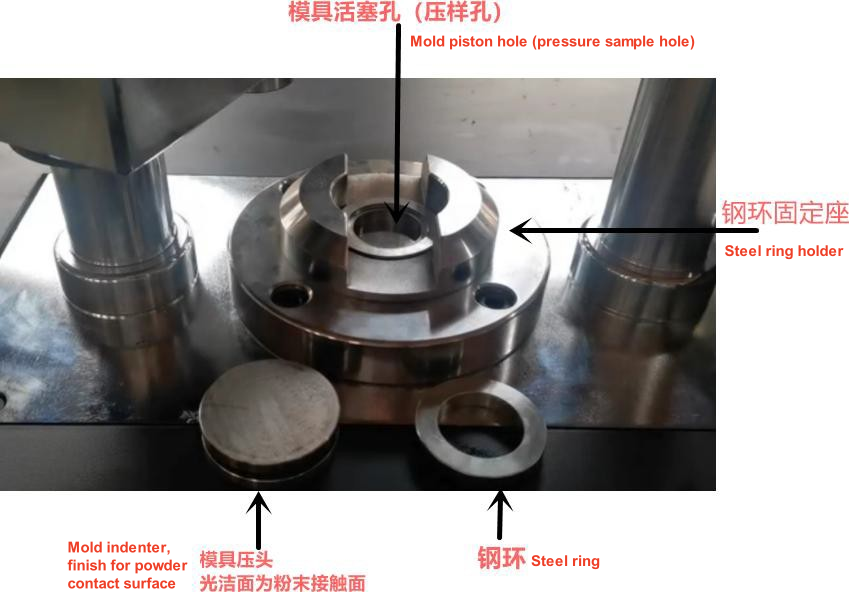
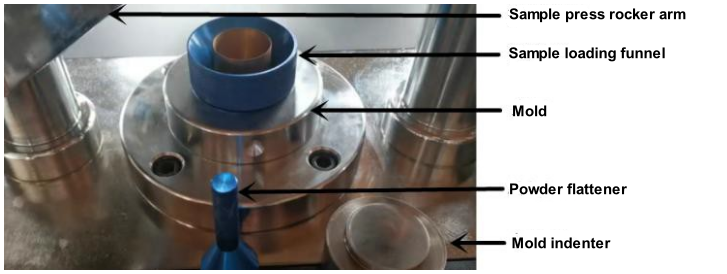
Schematic diagram of the workspace
1. Setting, holding pressure/replenishing pressure/holding time value, other parameters adjusted according to the actual situation, the piston should be located below the orifice of about 2 - 4 cm, to reserve space for the loading of powder samples, the piston stay position can be set.
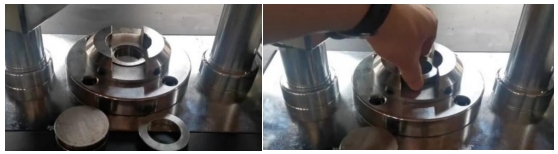
2. Push off the beam and install the steel ring into the holder.

3. Load the powder sample into the steel ring.
4. Attach the mold indenter, taking care to keep the clean side of the mold indenter facing down.
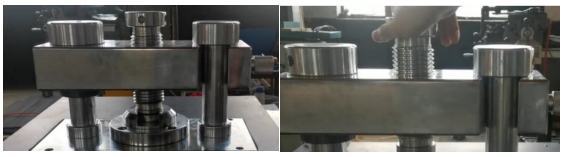
5. Close the crossbeam and snap the crossbeam recess into the column boss.
6. Screw the screw and hold the mold indenter.
7.Press the start button, start pressing the sample, hold pressure

8. After the sample holding pressure is finished, the equipment automatically relieves the pressure, loosens the screw, pushes away the beam, removes the mold indenter, and then removes the pressed sample.
(D) Plastic ring mold pressure sample operation steps
1. Set the value of holding pressure/replenishing pressure/holding time, and other parameter values are adjusted according to the actual situation.
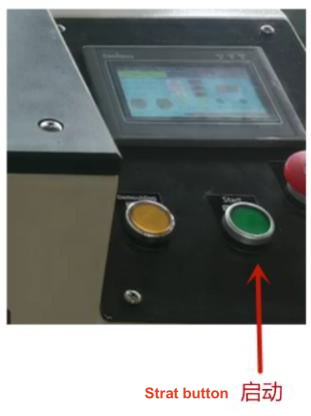
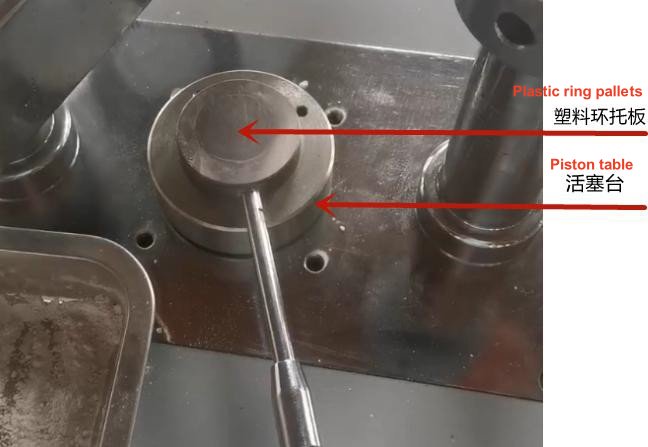
2. Push open the beam, start loading samples, plastic ring, plastic ring pallet (note that the relative smooth side of the plastic ring pallet facing up) must be placed in the middle of the press head under the beam, some models with positioning stopper, pallet against the stopper can be.
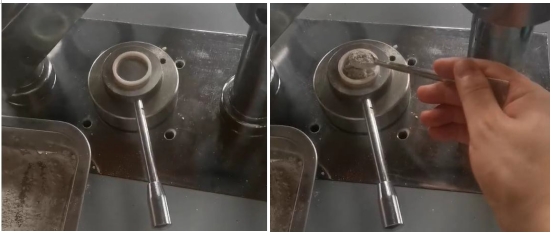
3. Place the plastic ring on the pallet and pour the powder sample into the ring.
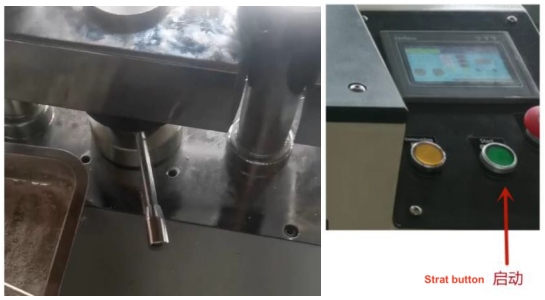
4. After loading the sample, close the beam, snap the concave part of the beam into the convex head of the column, press the start button, start pressing the sample and hold the pressure.
5. After the holding time is over and the piston is automatically reset; push away the beam and take away the pressed sample.
I. Precautions for the use and maintenance of equipment
1. Clean up the dust and other dirt after use, keep the equipment, mold clean and clean, in order to prevent the next use of contaminated samples.
2. Check the oil volume of the oil tank every 1 month, if it is lower than 2/3 of the oil table, replenish the clean No. 46 hydraulic oil.
3. Molds should be held lightly, especially powder contact surface, more should avoid bumping, scratching.
4. The touch screen should not be clicked with sharp objects, avoiding hard objects knocking.
5. Add appropriate amount of grease (oil) to the rotation of the crossbeam and the movable screw every 3 months to avoid dry rotation.
6. Check whether the fastening bolts and screws of the equipment are loose once a year, and tighten them in time when they are found to be loose, and add appropriate amount of lubricating grease (oil) to each lubricating part.
7. Equipment standby when not in use, maintenance and repair before, should cut off the power supply to avoid danger;
8. Equipment parameters should not be adjusted arbitrarily for non-production needs;
J. Press sample machine pressure comparison table
40T press sample machine pressure comparison table
|
Actual pressure value (tons) |
Touch screen setting value (KN) |
Pressure gauge corresponding display value (MPa) |
|
10 |
100 |
7 |
|
20 |
200 |
14 |
|
25 |
250 |
17.5 |
|
30 |
300 |
21 |
|
40 |
400 |
28 |
60T press sample machine pressure comparison table
|
Actual pressure value (tons) |
Touch screen setting value (KN) |
Pressure gauge corresponding display value (MPa) |
|
10 |
100 |
5 |
|
20 |
200 |
10 |
|
30 |
300 |
15 |
|
40 |
400 |
20 |
|
60 |
600 |
30 |


1 Standard exported package: Internal anticollision protection, external export wooden box packaging.
2 Shipping by express, by air, by sea according to customers' requirements to find the most suitable way.
3 Responsible for the damage during the shipping process, will change the damage part for you for free.

Previous :
Lab 40T Automatic Fluorescent Tablet PressNext :
Lab 24T 600W Programmable Manual Hot Press with Double PlateCategories

Sales Manager: Gia Email: Gia@tmaxlaboratory.com Wechat: Dingqiuna
Sales Manager: Gia Email: Gia@tmaxlaboratory.com Wechat: Dingqiuna

Sales Manager: Gia Email: Gia@tmaxlaboratory.com Wechat: Dingqiuna

Sales Manager: Gia Email: Gia@tmaxlaboratory.com Wechat: Dingqiuna

Sales Manager: Gia Email: Gia@tmaxlaboratory.com Wechat: Dingqiuna

Sales Manager: Gia Email: Gia@tmaxlaboratory.com Wechat: Dingqiuna

Sales Manager: Gia Email: Gia@tmaxlaboratory.com Wechat: Dingqiuna

Sales Manager: Gia Email: Gia@tmaxlaboratory.com Wechat: Dingqiuna
For inquiries about our products or pricelist, please leave to us and we will be in touch within 24 hours.
© Copyright: 2025 Xiamen Tmax Battery Equipments Limited All Rights Reserved.

IPv6 network supported


